Sunday, July 27, 2014

BLACKBERRY LEAF

Blackberry Leaf ~ Organic~ (Rubus fruticosus)
1 oz $2 (OUT OF STOCK)


All parts of the plant can be used medicinally. It is high in antioxidants, Vitamins A & C, Iron and Magnesium. In small amounts, it has been recognized to help in relieving sore throats, gum inflammation & bleeding, vision, psoriasis, eczema, memory, hemorrhoids, diarrhea, dysentery, and mouth sores. 


Making a poultice with any part of the plant including the fruit, can be used topically, to control minor bleeding from cuts and scrapes.

The dry herb can be used in baths, compresses, teas and the fresh leaf is lovely in salads.


2tsp. of dry leaves per 1 cup of boiling water makes a tasty tea. Allow it to steep for 10 minutes before drinking.
Drink 2 to 3 cups per day to ease the symptoms of diarrhea and abdominal cramping. You can also apply the tea directly on psoriasis, rashes or add the leaves to a bath. Chewing on the leaves can stop gum bleeding and help canker sores and inflamed gums.


Warnings: Although beneficial in many aspects, drinking large amounts of this tea can have the opposite effects, including stomach upset, nausea and vomiting. Not recommended for people suffering from any kind of liver disease. Blackberry leafs contain Tannins, which can interfere with the absorption of calcium and iron. Consult a physician if in doubt.


Magickal & Spiritual: In the old days, Gypsies used Blackberry leafs in ritual to get rid of evil spirits and return evil to the originator or simply for revenge. This is a practice that later, was adopted by many Pagan and Wiccan traditions.


Pagans Brew or Chilean  Borgogna  
for the older kids (over 21)
This is a delicious party cocktail, that can be served hot or chilled overnight, but I must worn you, that eating the fruit will make you loopy. 
1 bottle of Pinot Noir, 1 bottle of Cabernet Sauvignon, 1 cup of sugar, 1 tbsp or fresh orange zest, 2 cinnamon sticks, 3 cloves, 1 can of Canada Dry, 3 oranges washed and sliced in thin half moona (use these to get the zest 1st, then cut them), 1 cup Raspberries, 1 cup blueberries, 1/2 cup chopped (1" squares) apples.
Bring the Pinot Noir to a boil in a pot with the cinnamon, cloves, orange zest, and sugar. When it comes to a boil, add oranges and apples and boil for 2 minutes. Remove from heat immediately. Add the other bottle of wine, all berries and put in the fridge overnight. The next day when ready to serve, taste (add sugar if needed) and add Canada Dry. Put a little of the fruit in a wine glass and pour wine over it. You can also add Watermelon and grapes if in season.
Now take away car keys from all your guests. Enjoy.
Believe it or not, this drink is consider very healthy, full of antioxidants, and It is something my grandmother use to serve during the cold winter months, specially when everyone's immune system was down. 


DISCLAIMER
Our products have not been evaluated by the FDA, and are not intended to diagnose, treat, cure, prevent disease or spiritually nor magically resolve any life issues. By you making a purchase from us, you assume all liabilities and responsibilities, including any/and all products you decide to use for human consumption, create for yourself, gifts or resale. You agree you will not hold The Magick Wizard & The Wacky Broomstick, liable for damages or issues arising from, or in connection with, the misuse of any of our products. This applies to all damages without limitations. We disclaim any and all liability if the user prescribes to others, or uses any essential oils or herbal remedies internally or topically, without the proper advise of a healthcare professional, personal knowledge or training. All information posted, has been gathered from many years of personal studies, research, books and many websites. We recommend keeping all items away from children and pets and always make life magickal.
Thank you for visiting us and Bright Blessings!
The Magick Wizard and The Wacky Broomstick

Red Raspberry Leaf Tea

Red Raspberry Leaf Organic (Rubus idaeus)
$2 for 1 oz 
Visit our Etsy Shop
https://www.etsy.com/listing/197877026/red-raspberry-leaf-organic-1oz-sale


The leaves of the Red Raspberry plant are a wonderful antioxidant full of vitamins A,B,C, E, Calcium, Potassium, Citric & Folic Acid and other nutrients like fragrine, a volatile oil that beneficially affect the muscles of the womb during pregnancy.
According to a report published by the Australian College of Midwives, red raspberry leaf can decrease the incidence of preterm labor, post-term labor, forceps delivery and caesarean section without any increased risk of complications.


Aside from giving you lots of energy and improving circulation, It is know and recommended for strengthening and toning the uterus, PMS, Menopause, menstrual cramping, nausea & vomiting, Incontinence, diarrhea, bed wetting, reduces fever, colds, lowering blood pressure, and it supports the whole system during pregnancy.Always pick leaves early in the morning and while the plant is in blossom. 

Skip the ones that have fruit and pick the young leaves. These hold a punch. 


Hung them to dry after they’ve been washed, or lay them flat on a clean screen, leaving space between them to avoid mold. Dry them from 2 to 5 days depending on the weather. One to 2 tsps. of dry leaf in 1 cup of boiling water, makes a tasty wonderful tea. You can make a tincture.

Magickal & Spiritual uses: healing, protection, and fertility. Consuming red raspberry tea carries kindness and gentleness throughout the body via the heart.


Warnings: Non noted. Gentle for children over the age of 6. 

This information is not intended to diagnose, treat, cure,  prevent any disease or magically fix any life issues. 


Incontinence Tea: Mix equal parts of Agrimony, Raspberry, St. Johns Wort, Corn Silk. For men, add Nettle to the mix.

Summer Family Quencher Ice Tea: 1 gallon of water (distilled), 4 tbsp. of dry Raspberry Leaf, 4 tbsp. of dry Hibiscus flowers, 1/2 cup Lemon juice, 1/2 cup Orange juice (optional), 1/2 cup raw cane sugar (or honey) 1 cup or fresh raspberries.
Boil 4 cups of water and add the dry herbs letting them steep for 10 to 15 minutes. Strain and sweeten with the raw sugar or honey. Add the rest of the ingredients and a good amount of ice. Taste and add more honey if you need to. Delicious, nutritious and refreshing.

Pagans Brew or Chilean  Borgogna  
for the older kids (over 21)
This is a delicious party cocktail, that can be served hot or chilled overnight, but I must worn you, that eating the fruit will make you loopy. 
1 bottle of Pinot Noir, 1 bottle of Cabernet Sauvignon, 1 cup of sugar, 1 tbsp or fresh orange zest, 2 cinnamon sticks, 3 cloves, 1 can of Canada Dry, 3 oranges washed and sliced in thin half moona (use these to get the zest 1st, then cut them), 1 cup Raspberries, 1 cup blueberries, 1/2 cup chopped (1" squares) apples.
Bring the Pinot Noir to a boil in a pot with the cinnamon, cloves, orange zest, and sugar. When it comes to a boil, add oranges and apples and boil for 2 minutes. Remove from heat immediately. Add the other bottle of wine, all berries and put in the fridge overnight. The next day when ready to serve, taste (add sugar if needed) and add Canada Dry. Put a little of the fruit in a wine glass and pour wine over it. You can also add Watermelon and grapes if in season.
Now take away car keys from all your guests. Enjoy.
Believe it or not, this drink is consider very healthy, full of antioxidants, and It is something my grandmother use to serve during the cold winter months, specially when everyone's immune system was down. 


DISCLAIMER
Our products have not been evaluated by the FDA, and are not intended to diagnose, treat, cure, prevent disease or spiritually nor magically resolve any life issues. By you making a purchase from us, you assume all liabilities and responsibilities, including any/and all products you decide to use for human consumption, create for yourself, gifts or resale. You agree you will not hold The Magick Wizard & The Wacky Broomstick, liable for damages or issues arising from, or in connection with, the misuse of any of our products. This applies to all damages without limitations. We disclaim any and all liability if the user prescribes to others, or uses any essential oils or herbal remedies internally or topically, without the proper advise of a healthcare professional, personal knowledge or training. All information posted, has been gathered from many years of personal studies, research, books and many websites. We recommend keeping all items away from children and pets and always make life magickal.
Thank you for visiting us and Bright Blessings!
The Magick Wizard and The Wacky Broomstick

Sunday, June 22, 2014

PENTACLE HERB RACK

Making a Pentacle Herb Rack

You can make it any shape you want, but this tutorial is for a Pentacle Herb Rack.


I made my firsts one about 7 years ago, but unfortunately it came apart. I didn't use the right materials, specially because I keep one of them outside, and it's expose to the elements. I do keep it in the shade of course, you don't want to dry you beautiful herbs in the sun. Letting them dry slowly in the shade or inside the house, not only will preserve their bright color, but also their aroma, medicinal and magickal benefits.
So here's a better version (I think ), on how to make them to last. I've made different kinds and shapes thru the years, but I must admit, this is my favorite, because I can turn it and grab what I need with ease.

Your first step, is gathering branches strong enough to hold your herbs. You will need 5 for this pentacle and in whatever size you want. We trim our Mulberry Tree every year and use the branches to make trellises and cages for our vines, like tomatoes, beans, grapes etc... They work wonderful.
They don't need to be dry for this project, because like the herbs,... they will dry with time. I also use fishing line (stolen from the hubby). Good thing about fishing line, is that is nylon and it will hold those branches together wonderfully for years, and years, no matter how bad the weather gets. Ok, so here's a list of things you need:

Scissors, Fishing Line, Twine (optional), 5 equal size branches, herbs and/or flowers, small name tags, marker, wire cutter, and wire. I'm using copper, because I have lots of it, but silk flower wire work great also.


On a flat surface. Form your Pentacle, and don't worry to much at this point it it's straight. That part will come to play later, when you secure the inside.
Cut 10 long equal pieces of fishing line. Star wrapping your 1st 2 branches together and make sure to go in between for extra support.

When I say go in between, I mean criss-cross. Tie several knots (3 or 4) when you're done. Now, do the same exact thing again, but this time use the twine, right on top of the fishing line. The twine looks nice and rustic, but it does deteriorate over time. If this happens, you will have the back-up of the fishing line underneath. You don't have to do the twine, that is up to you.


Repeat until you've done all five outer points.

Now it's time to give it shape. Yes, once you do the inside, is what's going to secure the shape. If you don't, then it will move around and have no support.

After you tie the first inside one, keep checking to make sure your pentacle is straight. At this point is better to keep it flat on the table, and work around it, at least until you've tied 3 of them. Repeat the twine. Again, this step is optional.

 Cut another 5 equal length fishing lines again and make them long. About 36" each.

 tie each one to the inside or outside points. Stretch them up keeping the pentacle flat on the table. Bring all 5 lines together and make a strong knot on top. You can add a key ring if you have one, or make one with wire. This will be your loop to hang from the hook on the ceiling.


 Now you can make some hooks with silk flower wire, or any flexible wire you may have, or simply tie your herbs directly to the branches. I happen to have both so the photos show you both kinds.

 Use the same branch to shape and hug the brunch, and close it so it secure

 Then bend the wire opposite forming an "S" shape.


 I just happen to have copper, which I love, so that's what I used for my outside rack.


Now is time to make labels for you herbs and flowers. This is a must because a lot of them are very similar and difficult to distinguish once they've dried. Make your own with a little thicker paper. You can even get fancy and print them on the computer. Punch a hole and tie twine of any ribbon you have. You can re-use these labels for next time.


After you cut your fresh herbs and flower, make sure you wash them well, 2 and 3 times. Even though we do not use any pesticides, I still put mine in 5 gallon buckets and let them soak in cold water, and rinse them 3 times + if necessary. Then I tie them and hang the id-label.


This time, I am drying, Peppermint, Spearmint, Pineapple Mint, Catnip, Comfrey, Cilantro, Lavender, (2 kinds), California Poppy, Basil, Sage, Oregano, Dill, Rosemary, Thyme and Una de Gato (Cat's Claw).


A quick word on Cat's Claw. If you happen to grow this highly medicinal plant yourself and you haven't dried it before,... a word of caution:


Remove the thorns before you dry it. It's a lot easier and safer while is still green. You don't use the leaves, only the bark to make tinctures and teas. I use a piece of tape and put the thorns on it so they stick. You don't want them flying around if you have pets.

 Ok, back to work.  Now is time to hang your Pentacle. You'll need to have a hook drilled to the ceiling, or those removable hooks that you do not have to drill. They have tape. That's what I used on the outside one, because I didn't want to drill a hole on my awning.


You can see how I placed my copper hooks, so I can easily hang each herb.


My inside one, is drilled to the ceiling. I keep this one in my work room.


Time to hung whatever flowers or herbs you're drying.

 I like hanging the heavier herb bundles towards the middle, just to balance out the pentacle.

Hope you enjoyed this little tutorial and I didn't make it to long and boring.

Blessed Be

Sunday, May 25, 2014

A Crafty Day of Recycling Toilet Paper Rolls. Care to join me?


Candles and Toilet Paper Rolls???
What on earth am I talking about....

I can not remember were I saw these being made, but I know someone inspired me. 
They made these simple, but cute fake candles for Halloween and I thought, what a great prop to decorate inexpensively and have fun making them with the older kids or friends. 
The instructions were simple but I noticed they didn't last very long, and they tumbled easily, so.... I came up with my own way of making them, and they will last as long as you want them around. 
Be as creative as you want. Use the on your Altar, around you home, for the holidays and wonderful for Samhain.

The wee ripper dolls are made of clay and that will be another crafty day. These were inspired by Penny Parker.

PLEASE NOTE, before we even start, remember that these are only to be used with battery operated tea lights.  NEVER, NEVER put a real candle with an open flame in them. 
One more point for you to consider, you will be working with a hot glue gun, so I do not recommend this craft for little ones, unless they join you during the painting instructions.

The recycling part consist in saving the disposable tubes of toilet paper, paper towels of even gift wrapping paper. It all depends on what size candle you want to make. Here, I will show you a couple of different ways you can do this so you can customize your own. 
The first instructions can be as simple as you want them to be. The second instructions are with Paper Mache, which I personally prefer but, if this is your first time making these, stick to the first instructions and then venture further.

I am only sticking to 2 ways for now. Yes, there's more ways and ways were you can use real candles, but that will be some other time.

Ok, here's what you will need to start.


Toilet Paper, Paper Towels cardboard tubes
1 piece of carton (you can use a piece of box you don't need, like the lid)
Masking tape 
Battery Operated Tea Lights
Small paint brushes
1 sponge brush
Mod Podge
Rocks, for however many candles you are making and make sure they fit under the tube
2 good glue guns
1 big bag of glue sticks
Acrylic paints (choose whatever color theme you would like) 
1 disposable paper plate
1 small dish for Mod Podge
1/2 cup of water
1 can of Clear Matte Sealer Spray
Plastic or paper to protect your table


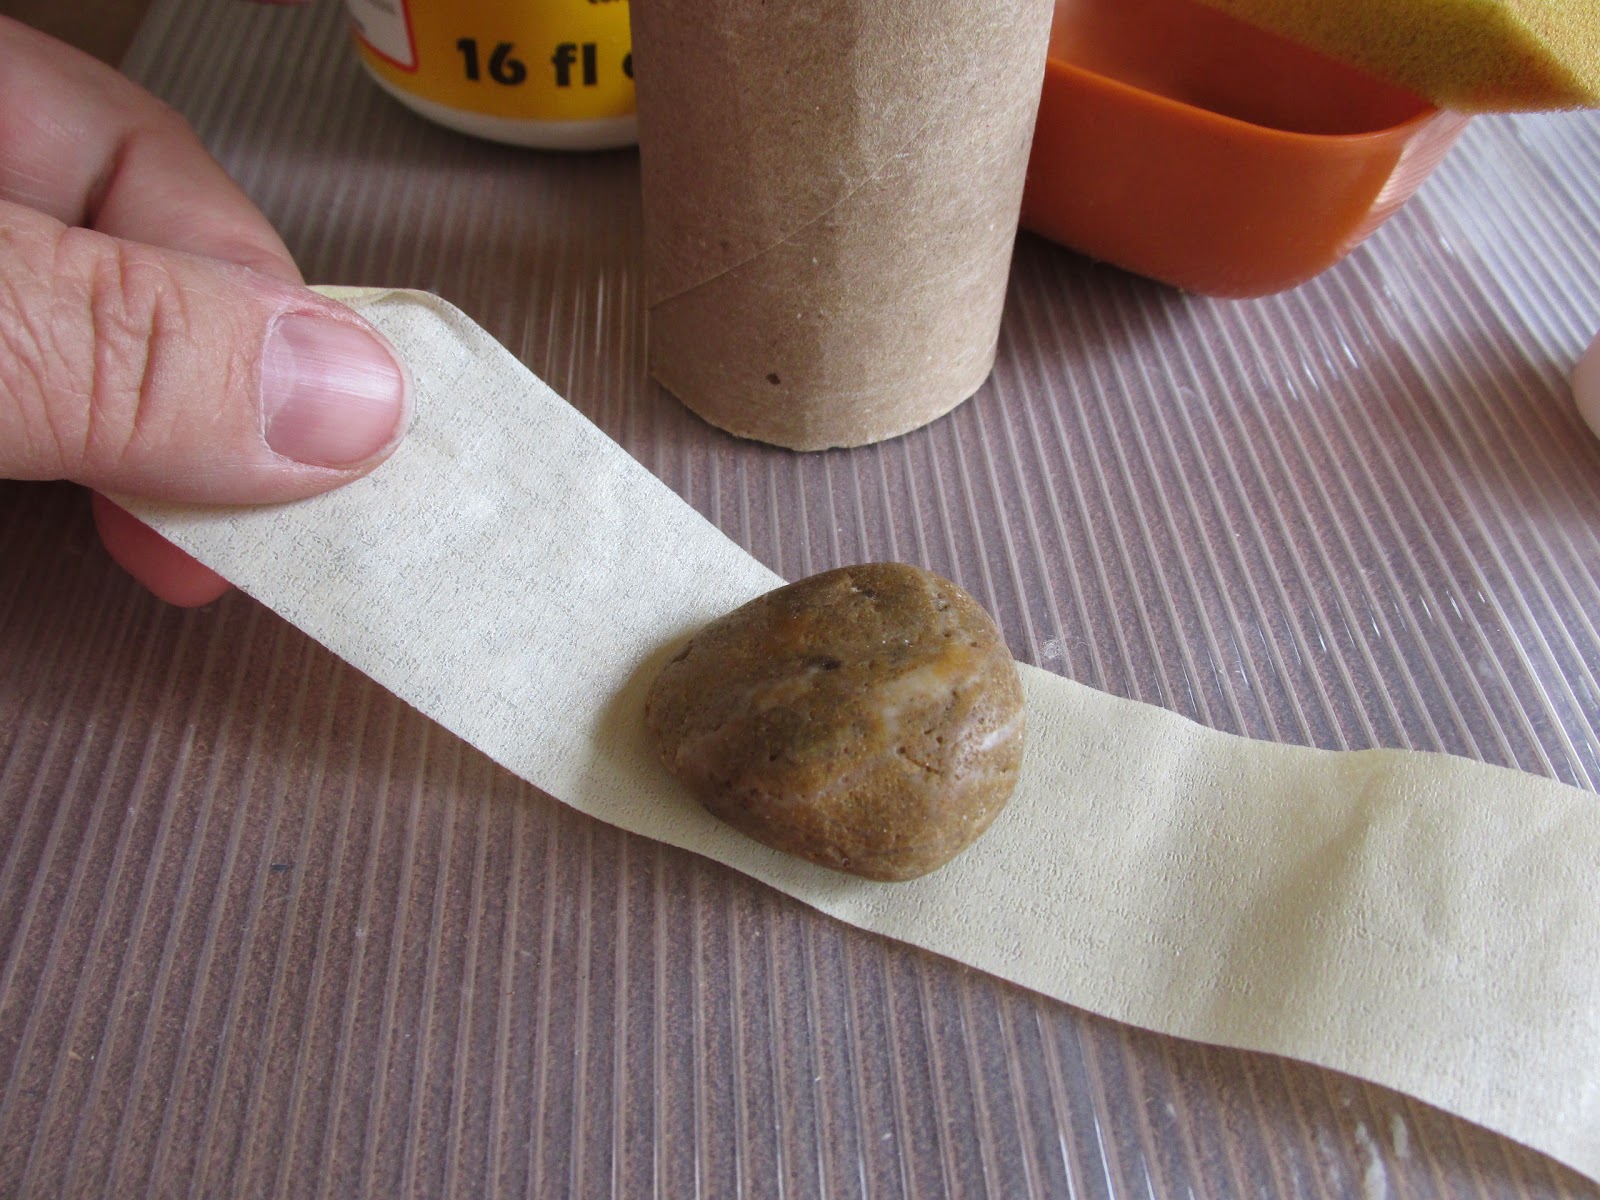
Cut a piece of tape about 8".


 With sticky side up, place the rock in the middle


Place the paper tube right over the rock.
 
 and secure the tape on both sides of the tube.


Place tube on carton and draw a circle, 1/4" to 1/2" larger than the circumference of the tube. It does not have to be perfect. This is your base so the candle won't tumble.


 Cut it.  Again,... it's better if it has a raged look and not perfect.


Load the bottom with glue, (the side that has the rock) stand it on your cut circle and seal it with more glue around the base. 
Just picture how real wax would fall down to the base. That's the basic idea, but at the same time it's giving you a solid strong base.


 Now, cut another piece of tape a little longer than before, and tape one side to the opposite side of the paper tube (which will be the top of the candle).


 Carefully, continue taping a little bit on the inside, leaving one side untaped


While holding the untaped side, place the tea light on the inside and gently push it down until the edge of the plastic does not show over the edge of the paper roll. I like to push it a little deeper for a more natural look.


Once you feel it's deep enough, go ahead and secure the other side of the tape to the paper roll.


I like to give it a little shape by tearing a couple of small pieces right of the top. Kind of like a natural candle would concave on one side and then start dripping......


Retest your tea light after you tear those pieces, just to make sure it's still deep enough and not showing. If you cut to much and it does show, it's ok, just untape the one side and push it in a little more.

 
This is an optional step and you do not have to do it, You can simply skip and go directly to drip gluing. 
**********************************************
If you would like to add more dimension to the candle, you can, at this point paper mache, or just use more tape, pinching and creating ridges and folds. Just make sure you don't do any sideways, it wouldn't look natural.


You can even build a little bit up on top.


Yes, I know it looks hideous.. but you will also use less glue. This project takes a lot of hot glue, so be prepared with at least 5 sticks per candle, and I use the bigger glue guns, the small ones are way to time consuming and it will take 4 times the amount of sticks.


Make sure all the tape is sticking and there's no loose ends.
Place the candle on a paper plate. This is so you can easily turn it while you apply the glue.


Time to play with the hot glue gun. Starting at the top, squeeze the hot glue and let it drip naturally down the sides, being careful to not get any on the inside. 

If you do get glue on the inside, just wait until it cools to the touch and remove it, otherwise your tea light will not fit. 


Use the paper plate to turn as you squeeze the glue.

 You can carefully add a little extra on top to give it more dimension, it's up to you.


 Make sure to get the edges you tore off and do a little extra drips on these.


Let the glue cool and dry for a little, and refit the tea light to make sure it still fits. This is when you'll know if you got to much glue on the inside.


 Make sure to remove all the glue hairs before your next step.


Now that the base is all done, lets make the candle stronger, so it will last you for years to come.
Pour some Mod Podge into a dish, and add a little bit of water to thin it out, about 1/2 the water to Mod Podge.


Mix the two well with your sponge brush, or other brush.


 Make sure you cover the whole candle including the inside were the tea light will go, and the base.
Let it air dry well. I like to place it outside in the sun. If its warm, it will take about 10 to 15 minutes.


After it's dry,.. again try the tea light to make sure it still fits.


Using a dark acrylic paint, paint the candle not missing any spots, include the inside were the tea light goes. I happen to have some black spray paint, so that's what I used for my base and it's a little faster.


Use Scotch-tape or Blue tape (it dose not stick much) and tape the flame part of the tea light. 


Paint it the same color as you base and when it's dry remove the tape.


Now it's starting to take shape. Some folk will leave it as is, just with the spray paint. That is also up to you. I like to complicate things (lol), and see what happens at the end, hehehe.


Choose whatever colors you want your candle to be. It's best to have a dark, a medium and a light color within the same pallet. Or you can mix and play with your colors. I used browns, mustard yellow and orange for mine. Be creative. I made one with a gold base (spray paint) and then touched up all the drips with copper and metallic black. I was beautiful.


 My colors don't look true on these photos, but the first color is actually brown. You want the base darker than the drips. Paint the drips last with a smaller brush, so you don't drip into the darker color.


Don't forget the inside.


Add whatever final touches you think it needs and make sure the paint is completely dry.

Take your project outside and seal your work with clear matte spray.

Not a great picture, but it gives you an idea. If you want, you can trim the carton around the glue and place them on a pretty dish, or leave it as is and surround it with raffia, small silk flowers, potpourri, or you could even stick them in sand with a few shells around it to give it a beachy feel.

Now below you can find a different way of making these with paper mache and still using the rolls as a base.


*************************************


Papier Mâché Toilet Roll Candles

The only extra ingredient you will need for this is, 1" strips of paper from paper bags, magazines, news paper etc...


There's a few different ways of making Papier Mâché mix. One involves cooking flour, water and sugar and the other, regular Elmer's glue and water.
Here's a great website if you want to learn a little more about it.
http://www.ultimatepapermache.com/paper-mache-recipes

We'll use white glue with this recipe. My ratio is 1/2 parts of water to glue. If you feel is still a little thick, don't be afraid of adding a little more water, but not to much.


This time I would like to make the candles a little thicker and taller.


Using the same rolls I will 
open them up and glue them 
together to make them 
whatever size I want.


Open all the rolls you think you'll need. I am using 4 toilet paper rolls for 1 fatter, taller candle.

Put them together as shown, about 1" apart or more.
Using the glue gun, dab some glue on the edges, enough for them to hold together.


Re- roll it and shape it. Follow the same instructions as above.


Cut several strips of paper


Use a larger flat dish to mix the glue and water so you have the space to soak the strips of paper.


Mix them well 


Brush both sides with the thin glue mixture and keep them moist while you work.


Cover your table with plastic bags or something you can dispose off. Or you can use a paper plate.


Don't forget to put loose tape on the top and fit the tea light. Follow the instructions for the first set of candles above. Make this one a little lower, or deeper.


At this point you can wear gloves but it's not necessary, this washes easily.


Strip by strip, start covering the whole surface of the candle vertically, folding the top part in and over the tape that will hold the tea light. 


Form folds and ridges while the paper is wet. 


Continue adding strips and overlapping, until the whole candle is covered.


Take it outside and let it dry for a few hours.


After is completely dry, apply glue and let it drip like you did with the first instructions.


Remove glue hairs


Cover the whole thing again with Mod Podge and let dry again.


Paint as per first instructions


I used a little crackle on the larger one, just for fun.


 Hope you enjoyed our little project. Make all your creations magickal and fun!

Blessed Be